This is in regards to converting a different Manufacturer's Localization file into Carlson SurvCE *.LOC format.

We don't offer a direct Conversion for GPS localization files because of the nature and complexity of the formulas each
different data collection software uses to create the files.

If you have a comma separated text file of the GPS Localization exported from a different Field Data Collection software
that contains comma separated fields with Northing, Easting, Elevation, Latitude, Longitude, Ellipse for each
localization point you can create a Carlson SurvCE *.LOC file.

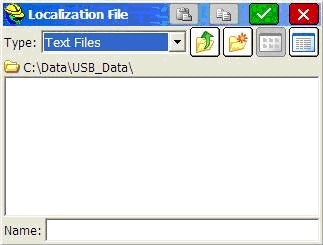
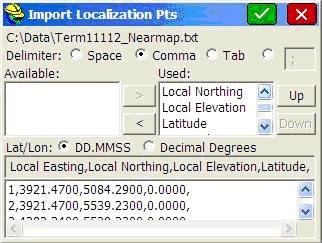
In SurvCE 2.58 and higher you can go into Equip / Localization / Points tab and tap the "Load" button.   Then change the
"Type" from "LOC" to "Text Files" in the upper left and select a TEXT file as shown below.

Then you can setup the screen with the formatting of your file and tap Green Check then save the results in the POINTS
tab as a Carlson *.LOC file.


***For older versions of SurvCE 2.56 and lower you can follow these steps:
Its usually pretty easy to convert the Northing, Easting & Elevation of the points into an Ascii Text file and you can
copy that to the Carlson SurvCE data collector and use File / Import Ascii to bring in the Local Coordinates.  The
difficult part is normally in bringing in the Raw Latitude & Longitude values.

First make sure you are set for the correct Projection Zone by going into Equip / Localization / System tab and checking
the current Projection.  If it says "USA/NAD83/AL East" and you aren't in Alabama you need to tap "Edit Projection List"
then tap the "Add Predefined" button in the bottom right and select your State Plane zone from the list.

After your set to the correct GPS Projection in Equip / Localization you can tap the "Points" tab then tap the ADD
button to add in localization points you can select the Point Number from the points you've imported to set the
Northing, Easting & Elevation and tap the Green Checkbox {or OK button}

Then you have 3 options for entering in the Latitude and Longitude for that point:
1) Read GPS
2) Enter Latitude / Longitude
3) From Raw File


Many times the easiest option is to walk over to the point with a Rover that is "Fixed" and just do a "Read GPS".

You also have the option of hand entering the Lat / Long in dd.mmssss format by hand if you want to.

The "From Raw File" option would require you to copy in the Latitude / Longitude and Ellipse into a Text File like the
example below and save it with an extension of .RW5 which some people are comfortable doing in an Exxel Spreadsheet and
formatting the columns to have the codes like LA and LN and EL.

***PLEASE NOTE:  Make sure to use dd.mmssss {degrees / minutes / seconds} format for your latitude and longitude.  This
file will cause errors if you try using decimal degree values.

!!! The "EL" raw ellipse value MUST BE a Metric Ellipse value !!!

JB,NMTest_JG,DT03-12-2008,TM12:04:05
MO,AD0,UN2,SF1.00000000,EC0,EO0.0,AU0
LS,HR0.0000
GPS,PN4,LA42.362018631639,LN-71.164715192188,EL102.18100,description
GPS,PN5,LA42.361412431639,LN-71.165212196188,EL109.429100,description
GPS,PN6,LA42.363217331639,LN-71.167615396188,EL98.327100,description


jg

***For older versions of SurvCE 2.56 and lower you can follow these steps: Its usually pretty easy to convert the Northing, Easting & Elevation of the points into an Ascii Text file and you can copy that to the Carlson SurvCE data collector and use File / Import Ascii to bring in the Local Coordinates. The difficult part is normally in bringing in the Raw Latitude & Longitude values. First make sure you are set for the correct Projection Zone by going into Equip / Localization / System tab and checking the current Projection. If it says "USA/NAD83/AL East" and you aren't in Alabama you need to tap "Edit Projection List" then tap the "Add Predefined" button in the bottom right and select your State Plane zone from the list. After your set to the correct GPS Projection in Equip / Localization you can tap the "Points" tab then tap the ADD button to add in localization points you can select the Point Number from the points you've imported to set the Northing, Easting & Elevation and tap the Green Checkbox {or OK button} Then you have 3 options for entering in the Latitude and Longitude for that point: 1) Read GPS 2) Enter Latitude / Longitude 3) From Raw File Many times the easiest option is to walk over to the point with a Rover that is "Fixed" and just do a "Read GPS". You also have the option of hand entering the Lat / Long in dd.mmssss format by hand if you want to. The "From Raw File" option would require you to copy in the Latitude / Longitude and Ellipse into a Text File like the example below and save it with an extension of .RW5 which some people are comfortable doing in an Exxel Spreadsheet and formatting the columns to have the codes like LA and LN and EL. ***PLEASE NOTE: Make sure to use dd.mmssss {degrees / minutes / seconds} format for your latitude and longitude. This file will cause errors if you try using decimal degree values. !!! The "EL" raw ellipse value MUST BE a Metric Ellipse value !!! JB,NMTest_JG,DT03-12-2008,TM12:04:05 MO,AD0,UN2,SF1.00000000,EC0,EO0.0,AU0 LS,HR0.0000 GPS,PN4,LA42.362018631639,LN-71.164715192188,EL102.18100,description GPS,PN5,LA42.361412431639,LN-71.165212196188,EL109.429100,description GPS,PN6,LA42.363217331639,LN-71.167615396188,EL98.327100,description jg