Knowledge Base
| Category: SurvCE|PC / SurvCE / HowTos | ||
| Topic ID: 816 | ||
| Title: How Do I Export A DXF From SurvCE? | ||
| ||
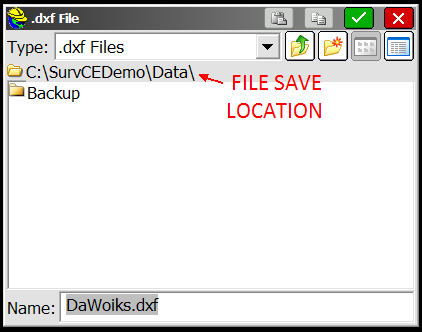
In order to export a DXF from your data collector, you must first create it in the MAP screen where CAD functions are available. This version of the MAP screen can be accessed through the Globe icon in main menu, at the top right of the screen. Once inside the MAP screen you will need to click on the File drop-down. The first option available in the drop down will be for the importing and exporting of drawing files. Drawing file types include both DXF and DWG. Selecting Export DXF will cause the program to create a DXF from your field work. You will be asked what you would like to name the file, as well as where would you like to save the file. | ||
| ||
| ||
|
 Once a name has been assigned, a window with export options will be displayed.
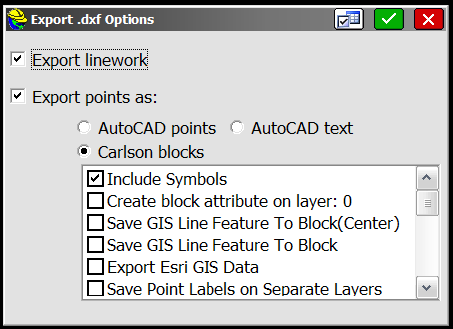 Create block attribute on layer: 0
All attributes such as point number, elevation and description take on the layer of the node.
If you do not put the attributes on layer 0, then they have distinct colors and layers for the number, elevation and description.
Save GIS Point Feature to Block
If GIS attribute data is included, this data
will appear beneath the description in a vertical, left-justified column (eg. 5.4=depth, 2=number of inlets, Cast Concrete=type).
Save GIS Line Feature to Block (Center)
Attributes associated with a polyline will draw in the middle of the longest segment of the polyline.
Save GIS Line Feature to Block
The GIS attributes of the polyline draw on the second point of the line, below the other "standard" point attributes such as elevation and description.
Other options in the command include drawing the actual point symbols, drawing
GIS line feature attributes and drawing in 2D (at zero elevation).
Exported DXF files can be transferred to your desktop computer through the same data transfer method as CRD and RW5 files.
Create block attribute on layer: 0
All attributes such as point number, elevation and description take on the layer of the node.
If you do not put the attributes on layer 0, then they have distinct colors and layers for the number, elevation and description.
Save GIS Point Feature to Block
If GIS attribute data is included, this data
will appear beneath the description in a vertical, left-justified column (eg. 5.4=depth, 2=number of inlets, Cast Concrete=type).
Save GIS Line Feature to Block (Center)
Attributes associated with a polyline will draw in the middle of the longest segment of the polyline.
Save GIS Line Feature to Block
The GIS attributes of the polyline draw on the second point of the line, below the other "standard" point attributes such as elevation and description.
Other options in the command include drawing the actual point symbols, drawing
GIS line feature attributes and drawing in 2D (at zero elevation).
Exported DXF files can be transferred to your desktop computer through the same data transfer method as CRD and RW5 files.